| | | | |
How to Make a Ring Sling
Cheat Sheet: After reading through the full tutorial, use this printable cheat sheet as a quick reference as you are working on your sling. RingSlingCheatSheet.pdf
Basic Breakdown of Steps
- Pick a safe fabric
- Buy the right amount of fabric
- Buy safe rings
- Scour your fabric (mandatory for osnaburg)
- Wash your fabric
- Dye your fabric (optional)
- Cut to width
- Hem 3 edges
- Pick & sew the shoulder
- Pockets and Accents (optional)
- "Breaking in" or softening your sling
- Learn to use it
Make sure to "expand" each section and read the full details the first time you read through.
1) Pick a safe fabric
Pick a bottomweight fabric that passes the Four Rules of Fabric Selection.
Read the Four Rules of Fabric Selection before fabric shopping to be familiar with what kind of fabrics are safe to use. The page even has a printable copy to take shopping with you, along with specific fabric suggestions.
To summarize, the four rules a fabric must pass are:
- FIBER CONTENT - Natural fibers; no spandex, polyester, or acrylic
- WEIGHT - bottomweight; sturdy like jeans or a tote bag; 185-220gsm or 5-7oz per sq yd
- WEAVE - no stretch; thicker threads; tight weave
- CARE INSTRUCTIONS - machine washable If your ring sling is going to be used in the water, you'll want to follow the guidelines for picking a safe athletic mesh fabric.
A popular choice for ring slings is using a cotton tablecloth. A 60" wide tablecloth that is at least 84" long (ideally closer to 100"+) can be cut in half lengthwise and will only need one raw side hemmed before sewing the rings in for the shoulder. Another good option in the USA is to go to Walmart and look for Waverly brand duck cloth in the upholstery fabrics. It will look a little canvassy, and the bolt tag will have a green circle with the weight "185 gsm" on it. If you are already a member of our Facebook group, check out this poll in the group to see real members' actual opinions and experiences on their favorite materials for a ring sling, or search the group for the hashtag "#fabric" for a number of posts and videos to offer guidance. You can also check this page for people's general opinions about different fabrics' qualities.
2) Buy the right amount of fabric
In general, 3 yards is plenty for almost every size wearer. Remember; you can always chop the tail shorter, but you can't make a too-short sling longer. You need to account for 10%-20% shrinkage and 5"-16" for the shoulder. 3 yards will allow for a 5" shoulder depth and 20% shrinkage and still make an XL sling.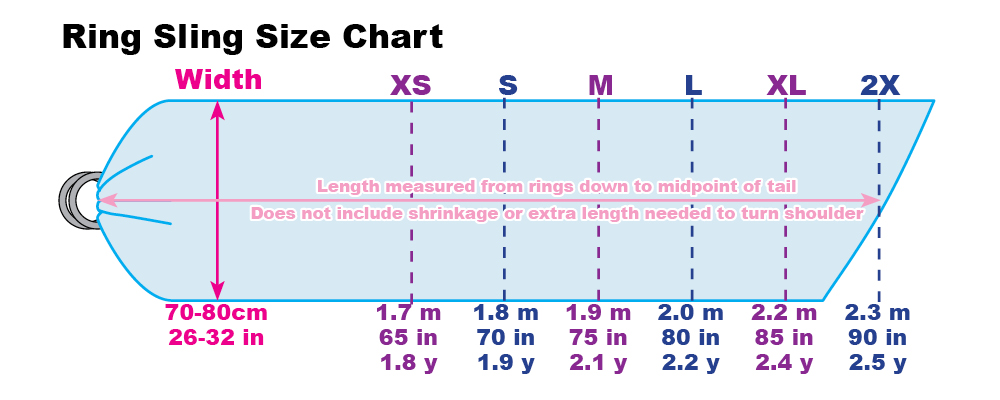
For a ring sling, length is simply a matter of how long you want your tail to be. A minimum length of 12" of tail beyond the rings is recommended for safety, but anywhere between this and knee-length is safe and usable from birth through toddlerhood. A longer tail can be used as a nursing cover, sun shade, or burp cloth. It can be wrapped around the rings as a cushion, rolled into the top rail as neck support, or pulled between baby's legs and the wearer for a reinforcing cross pass to dissuade leg straightening.
The chart below shows FINISHED length from rings to tail, which does not include shrinkage (typically 10%-20% for cotton or linen) or the amount of fabric turned under for the shoulder (which can range from 5" to 16".) The last column indicates the yards needed in order to account for 20% shrinkage, 5" shoulder depth, and 1" for the hems. Keep in mind that fabric like duck and most tablecloths will only shrink 10%, so you could get away with less fabric, but some shoulder styles like floating gathered may require more fabric. The "total yards needed" is just a ballpark.
The sizing below will APPROXIMATELY line up to a wearer of the same size unisex t-shirt, resulting in APPROXIMATELY a hip- or thigh-length tail.
Do not agonize too much about what size ring sling you need. Aim for the approximate size you think you are. As an example: I am a US size 8-10, 5'7" woman. I wear a small unisex t-shirt and vary between medium and large womens sizes and I can safely use anywhere from an XSmall to an XXLarge sling safely. The usable range is extremely flexible. When in doubt, buy enough fabric for a size up. You can always hem the tail shorter later. A properly sized ring sling can be used easily for either newborns or large toddlers. A ring sling is sized for the wearer, not the child.
| Ring Sling Size Chart |
Finished length rings to tail in meters |
Finished length rings to tail in inches |
Finished length rings to tail in yards |
Total yards needed (includes 5" shoulder depth & 20% shrinkage)
|
|---|---|---|---|---|
| Width | 70cm-80cm | 26"-32" | 0.7y-0.9y | n/a |
| XSmall | 1.7m | 65" | 1.8y | 2.4 (buy 2 1/2y) |
| Small | 1.8m | 70" | 1.9y | 2.5 (buy 2 1/2y) |
| Medium | 1.9m | 75" | 2.1y | 2.7 (buy 2 3/4y) |
| Large | 2.0m | 80" | 2.2y | 2.9 (buy 3y) |
| XLarge | 2.2m | 85" | 2.4y | 3.0 (buy 3y) |
| 2XL | 2.3m | 90" | 2.5y | 3.2 (buy 3 1/4y) |
3) Buy Safe Rings
Most (not all) fabrics for a ring sling will work well in a single layer with 3" large sling rings. Expand below to see a more detailed chart. Always buy unwelded rings DESIGNED for babywearing that have been tested for weight and safe materials.
A key part of the ring sling is the rings. Never use rings from the craft store, as these have not been weight tested and can break under weight. The best source for sling rings in the United States is Slingrings.com. If you are not in the US or have questions about rings (such as other sources and substitutions), read this page about safe sling rings.
If you are ordering official sling rings, you may have the choice between nylon or aluminum sling rings. Both are equally safe and rated to a minimum of 250lbs. The difference is mainly aesthetic, with most people prefering the thinner aluminum rings. Aluminum rings also tend to both be easier to adjust and yet grip the fabric better.
As far as size goes, refer to the chart below.
| Large Rings |
Aluminum Ring Dimensions:
|
|
| Medium Rings |
Aluminum Ring Dimensions:
|
|
| Small Rings |
Aluminum Ring Dimensions:
|
|
4) Scour
Scouring is a special deep-cleaning step. If you are using osnaburg, scouring is MANDATORY, even if you are not planning on dyeing the fabric. If you are using any other fabric, you can skip this step.
If you bought osnaburg, is MUST be scoured before hemming and using! This is a non-optional cleaning step necessary because osnaburg is an unprocessed fabric full of a lot of leftovers from the manufacturing process, and it will be in direct contact with your baby's skin (and likely their mouth.)
For instructions on how to scour osnaburg, click here.
5) Wash & Dry
Make sure to wash and dry all fabrics before sewing. Not only does this ensure you are starting with a clean surface, it will also get any shrinkage out of the way upfront.
Always wash your fabric before you start in order to get any and all shrinkage out of the way up front. The general recommendation is to wash your fabric however you plan to wash it in the future, but I prefer to start with a very hot wash and hot dry to get any and all shrinkage out of the way in case someone were to "help" and wash my sling for me.
You'll want to use a wrap-safe detergent. In general, wrap-safe detergents:
- Are free of dyes and fragrances (since the fabric will be in direct contact with delicate baby skin)
- Have no added fabric softener (which can coat the fibers and make them slippery)
- Are liquid, not powdered (powdered detergent can build up in the fibers and weaken them)
- Have no optical brighteners*
*Optical Brighteners, or "bluing agents," are often touted to damage fabrics and weaken fibers, but so far there is no scientific data to back this up. The only proven consequence of using a detergeng with OBs is the risk of spotting, plus some fears about having the leftover OBs in the fabric coming in contact with skin. Feel free to do your own research and make your own decisions regarding your family's use of OBs on your baby carriers. Keep in mind that washing a commercial carrier in OBs will drastically reduce resale value, as this is a question many buyers will ask.Washing raw, unhemmed fabric will cause the edges to fray a bit. Unless you are seriously worried about losing an inch or two on the width of your fabric (one reason to wash before cutting), this is not a huge issue. If you are worried about it, you can either use a serger or simply a zigzag stitch on your regular sewing machine along the edges to protect them.
6) Dye (Optional)
Dyeing is not nearly as scary or difficult as it may seem, although it is important to make sure to use a fiber-reactive dye when dyeing something that will be in contact with a baby and permanently fix the dye using soda ash.
(Optional) Dye with a baby-safe dye. Read through the dye information in our files, and join the Facebook group Dyed Baby Carriers for more info. While it is possible to dye a ring sling after sewing the rings in, it is much easier to do and much easier to get an even dye job beforehand, especially if you are use a shoulder style with any pleats. If you choose to dye after the rings are sewn in, you will need to wrap the rings in plastic wrap and then cover the plastic wrap in duct tape (turning the rings to make sure you also wrap the part inside the shoulder as well) because the soda ash used in the dye process will destroy the finish on aluminum rings.
7) Cut to width
Cut the fabric width down to between 28-34” (for a finished hemmed width of 26”-32”.) If you bought a 57"-60” wide tablecloth or 57"-60" wide bolt fabric, you will simply need to cut it in half lengthwise to be (approximately, after shrinkage) 28” wide. If you bought 45" wide bolt fabric, do NOT attempt to skimp by cutting the fabric in half; this will be much too narrow. Likewise, do not be tempted to try and make an extra-wide 45" sling to avoid cutting; this much fabric will likely not be adjustable through the rings. Some fabrics, including osnaburg and duck, will “snip and rip” straight. Simply snip about 1" of the fabric at the right width and then rip it down the length. If you aren’t sure, test near an edge. Otherwise, you can measure and iron a straight line and then cut along the crease. Jacquard tablecloths typically do NOT snip and rip easily.
As for cutting off extra length, I would personally suggest waiting until your sling has the shoulder sewn in so you can test it, then cut the tail to your desired length and hem the bottom at the end. You can always cut the tail shorter if it is too long, but you can't make it longer if you cut it too short.
Protip: If you have a narrow strip of "waste" fabric leftover after cutting the width, check out the babywearing accessories tutorials, many of which use much smaller pieces of fabric. One great option is to make a coordinating doll sling for an older toddler or young child to wear a babydoll with. This is also a good option if you have an older child who may get jealous of the younger being worn.Note: while "pockets and accents" are listed as an option later in the tutorial, some accents, like a band across the shoulder, edging down the hems, or a band across the tail, may be easier to add before the sling is hemmed and the shoulder is sewn in. Use your best judgement. Pockets, however, I prefer to do at the very end, when I can test the sling and get a feel for exactly how high or low to put the pocket on the tail. If the pocket is too low on the tail, it is nearly impossible to reach while the sling is being worn.
8) Hem your edges
Hem the two long edges of your fabric. If you are confident in your length, you can go ahead and hem the end of the tail as well.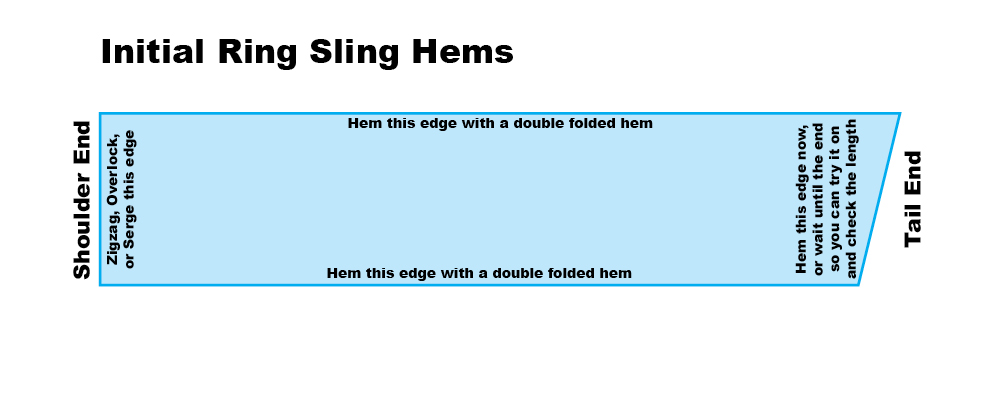
Once your fabric is the correct width, hem the two long edges. You can hem the end of your tail at this point if you are confident in the length, or you can wait until the end when you can try it on. That way, if the sling is too long, you can cut the tail shorter and then hem it.
For the shoulder end, the easiest and least bulky option is to serge, overlock or zigzag the raw edge to keep it from unraveling while you work the shoulder. A single folded hem (or the existing hem of a tablecloth) is okay for a gathered shoulder, but is too bulky if there are going to be any pleats involved. Serging or zigzagging the raw edge is especially important if you are working with a jacquard tablecloth or commercial woven wrap to keep the loose weave from unraveling.
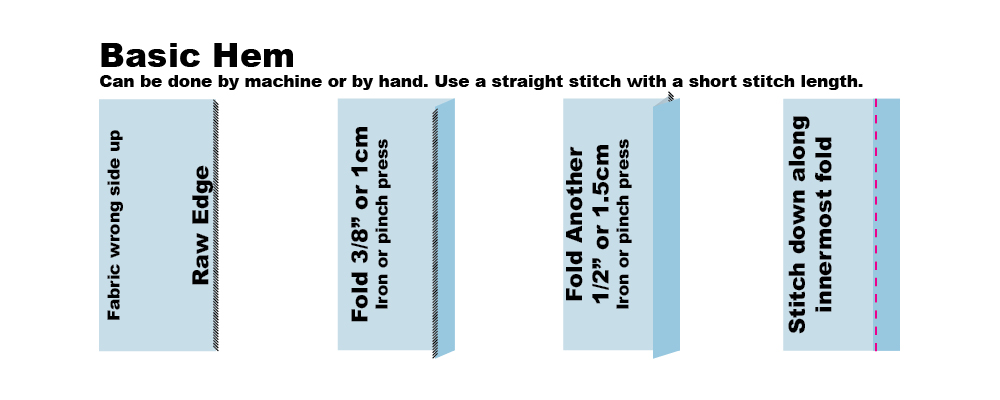
Hem with whatever method you are comfortable with. A double folded hem of between 1/4”-1/2” is typical. You can iron and pin your hems before sewing, use a rolled hemming foot, or just pinch press them like Jan does in this video. Serging the long edges is not preferred, but is okay (although the rails will not be as strong and more prone to damage, especially where the rings will constantly be rubbing them.) Hemming by hand is tedious but safe. One decorative option would be to simply bind the raw edges with bias tape.
 If you really want perfect mitered corners, this is my favorite video that shows how to do it (yes, the video is about dinner napkins. The technique still applies.)
It doesn’t matter too much what thread you use for the hems. Any all-purpose thread is fine. Just keep in mind that while polyester thread is stronger, if you plan on dyeing your sling later, polyester won’t take dye, so use a thread matching the FINAL color of your sling. Unless you are an experienced sewer, avoid “heavy duty” thread, as these can jam up your machine and cause all sorts of frustration if you aren’t used to adjusting the tension. Again, since hems aren’t “structural,” feel free to use a straight stitch, zigzag, or even a decorative stitch for your hems. The main point of the hem is just to keep the folded fabric in place.
Depending on the type of extra details (like pockets, or accent fabrics) you want to add to your sling, this may be a good time to sew them onto the fabric, as opposed to trying to add them after the fact.
9) Pick & Sew Your Shoulder
Choose a shoulder style (a dice roll is a good method). After folding, ironing and pinning any desired pleats, fold the fabric through the rings and secure it in place with 3 parallel lines of stitching. Use 100% polyester thread for this step.Shoulder styles are a completely personal decision. What works for one wearer may not be comfortable for another, and vice versa. There are infinite ways to sew the shoulder, which further complicates the matter. That said, the three most popular shoulder styles are Pleated, Hybrid, and Gathered. All three of these can be worn on either shoulder. A little about these:
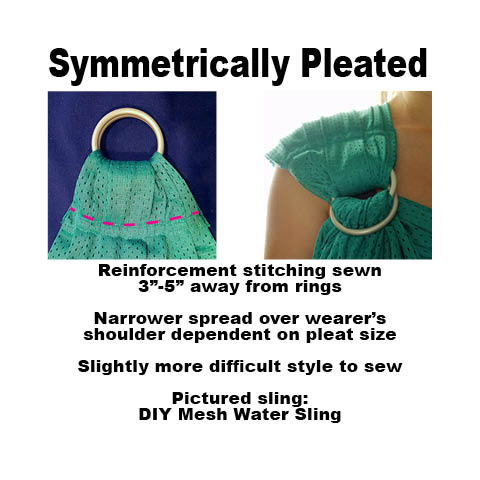
Pleated

 |
Hybrid (including Eesti)
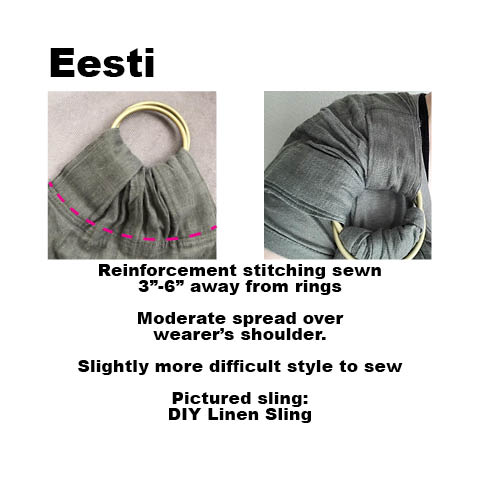 |
Gathered (including Floating Gathered)
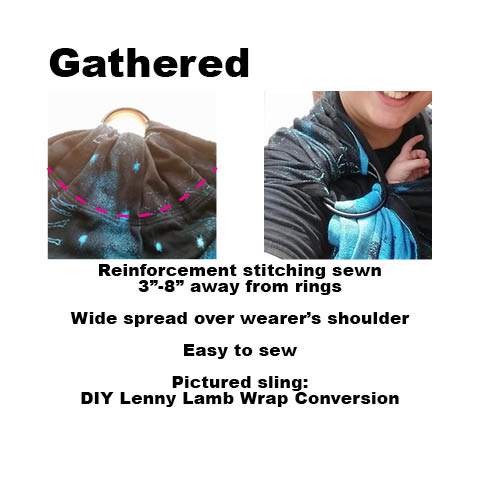
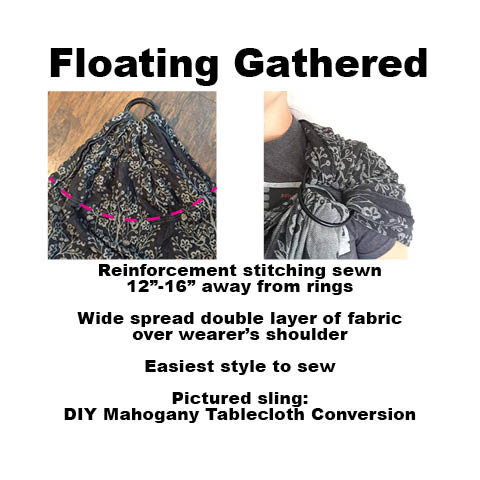 |
| Shoulder is pleated evenly across the width to bring width down where it goes through the rings. It is then folded under and three lines of reinforcement stitching are sewn very close to the rings. Uses the least amount of fabric for the shoulder. Lays neatly on the wearer's shoulder - no bunching or tangling. Easy to get the shoulder portion spread evenly, but does not spread very wide. Less likely to have the edges dig, but also does not distribute the weight of the baby quite as much as a gathered would. Generally (but not always) preferred by very small, thin wearers who feel overwhelmed by the wide spread of a gathered shoulder. | A few pleats on each rail, with the center of the wrap left straight to gather naturally. The fabric is folded through the rings and the three lines of reinforcement stitching are typically sewn fairly close to the rings. A "floating eesti" shoulder can be done with the stitching 9"-16" away from the rings; in this situation, you can add stitches lengthwise along the folds of the pleats in order to keep them neat and in place. Qualities are typically a balance between pleated and gathered. Less potentially diggy and spread than a gathered, but better weight distribution than a pleated. "Eesti" is a specific style of hybrid shoulder developed by Karen Hoppis. "Hybrid" in general refers to any shoulder style that incorporates both pleats and an unpleated, gathered portion of the shoulder. | Shoulder is left to bunch/spread naturally. Fabric is pulled through the rings, folded over and can either be sewn straight across with three lines of reinforcment close to the rings (for a traditional gathered shoulder) or further away (9"-16") for a floating gathered. Easiest style to sew. Can be more finicky to adjust on the shoulder; floating gathered especially, due to the double layer over the shoulder, can get bunched and tangled. Floating gathered has two layers of fabric across the shoulder, which adds cush and padding. While a poorly adjusted gathered shoulder can result in diggy rails, a well-adjusted gathered will give the best, most even weight distribution for longer wearing. |
10) Pockets and Accents (Optional)
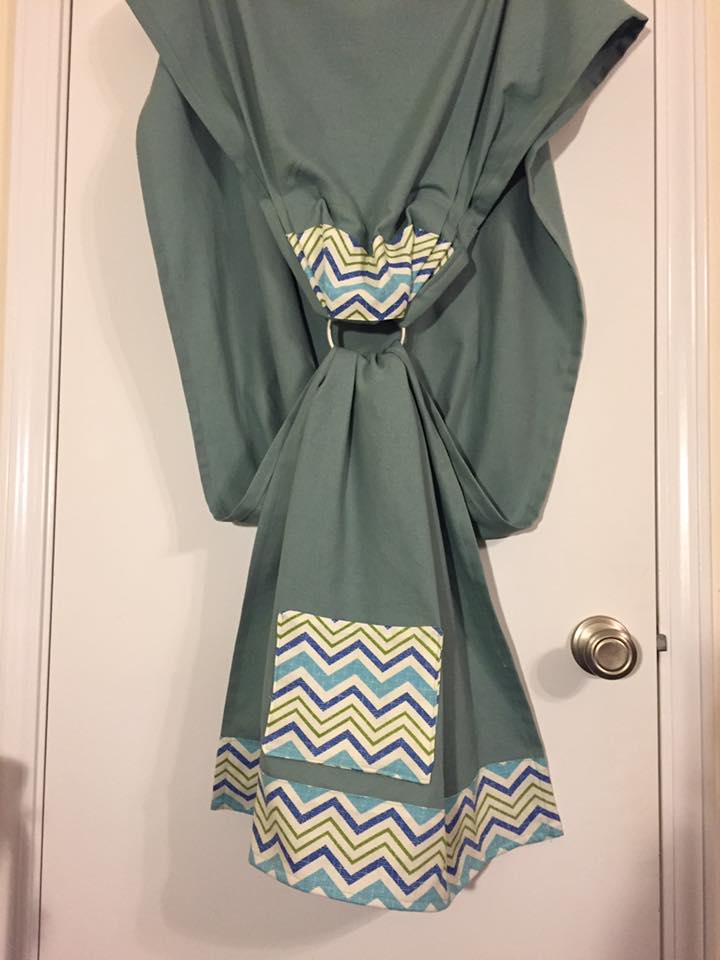 Pockets and accent pieces are a great option if your desired fabric pattern is only available in a thin, unsafe fabric like quilter's cotton. Sew decorative patterned accents onto a coordinating solid colored, wrap-safe fabric.
Pockets and accents can be a good way to dress up a sling, encorporate a fun patterned quilter's cotton on top of a coordinating safe fabric, or decorate the tail (especially on a tablecloth or duck sling with a blank wrong side.)
Some ideas can be found here. If you are a part of our Facebook group, you can check the ring sling album to see some inspiration pictures or watch our pocket sew-along videos!
11) "Breaking in" or softening your sling
A brand new sling (especially DIY) will likely be stiff and difficult to adjust through the rings. Softening the fabric through gentle use and abuse will help. Do not use fabric softener to "soften" a wrap or sling.
A brand new sling is often very stiff and difficult to adjust, especially when made from certain fabrics like duck or printed tablecloths. "Breaking in" is a process that will occur naturally by simply using the sling, but there are a few things you can do to accelerate the process. Always be sure to be gentle with the area of the sling where the rings are sewn in; this area does not need to be softened anyway, and you don't want to distress the stitches.
Sit on it
Fold or bunch the sling onto the front seat of your car while you drive (mind the rings) or on your sofa while you watch TV. If you are sitting on it in the car, be sure to tuck it under the seat or in the trunk when you aren't sitting on it; exposure to sunlight can break down the fibers and weaken the sling.
Sleep on it
Lay it underneath your fitted sheet and sleep on it (mind where the rings are - don't want to lay on those.) This is an especially good method if you are expecting and have some time before you need to actually use the sling.
Steam iron
A good steam ironing can help soften many fabrics, but linen is especially fond of a good steam. Be especially gentle with rayon when it is moist, as rayon is rather weak and brittle when wet.
Run it through the rings
Put the sling on just like you were going to wear a baby. Thread the tail through the rings and tighten it all the way up. Then loosen it so just the very tippy tail is through the rings. Tighten it all the way back up. Repeat, repeat, repeat. The gentle friction will help soften the fabric, and this method will specifically target the portion of the sling that needs softening the most.
Make sure you are tightening effectively
If the fabric is bunched up in the rings, it will be extremely difficult to tighten and may add to the problem. Whenever you thread the sling, make sure to finger walk the fabric in the rings. Then, when tightening, don't just pull the entire tail straight down. Tighten the top rail by pulling the inside edge of the tail horizontally behind baby's back. Tighten the bottom rail by pulling down and slightly away from your body. This method of tightening will help keep the fabric in the rings spread neatly.
12) Learn to use it
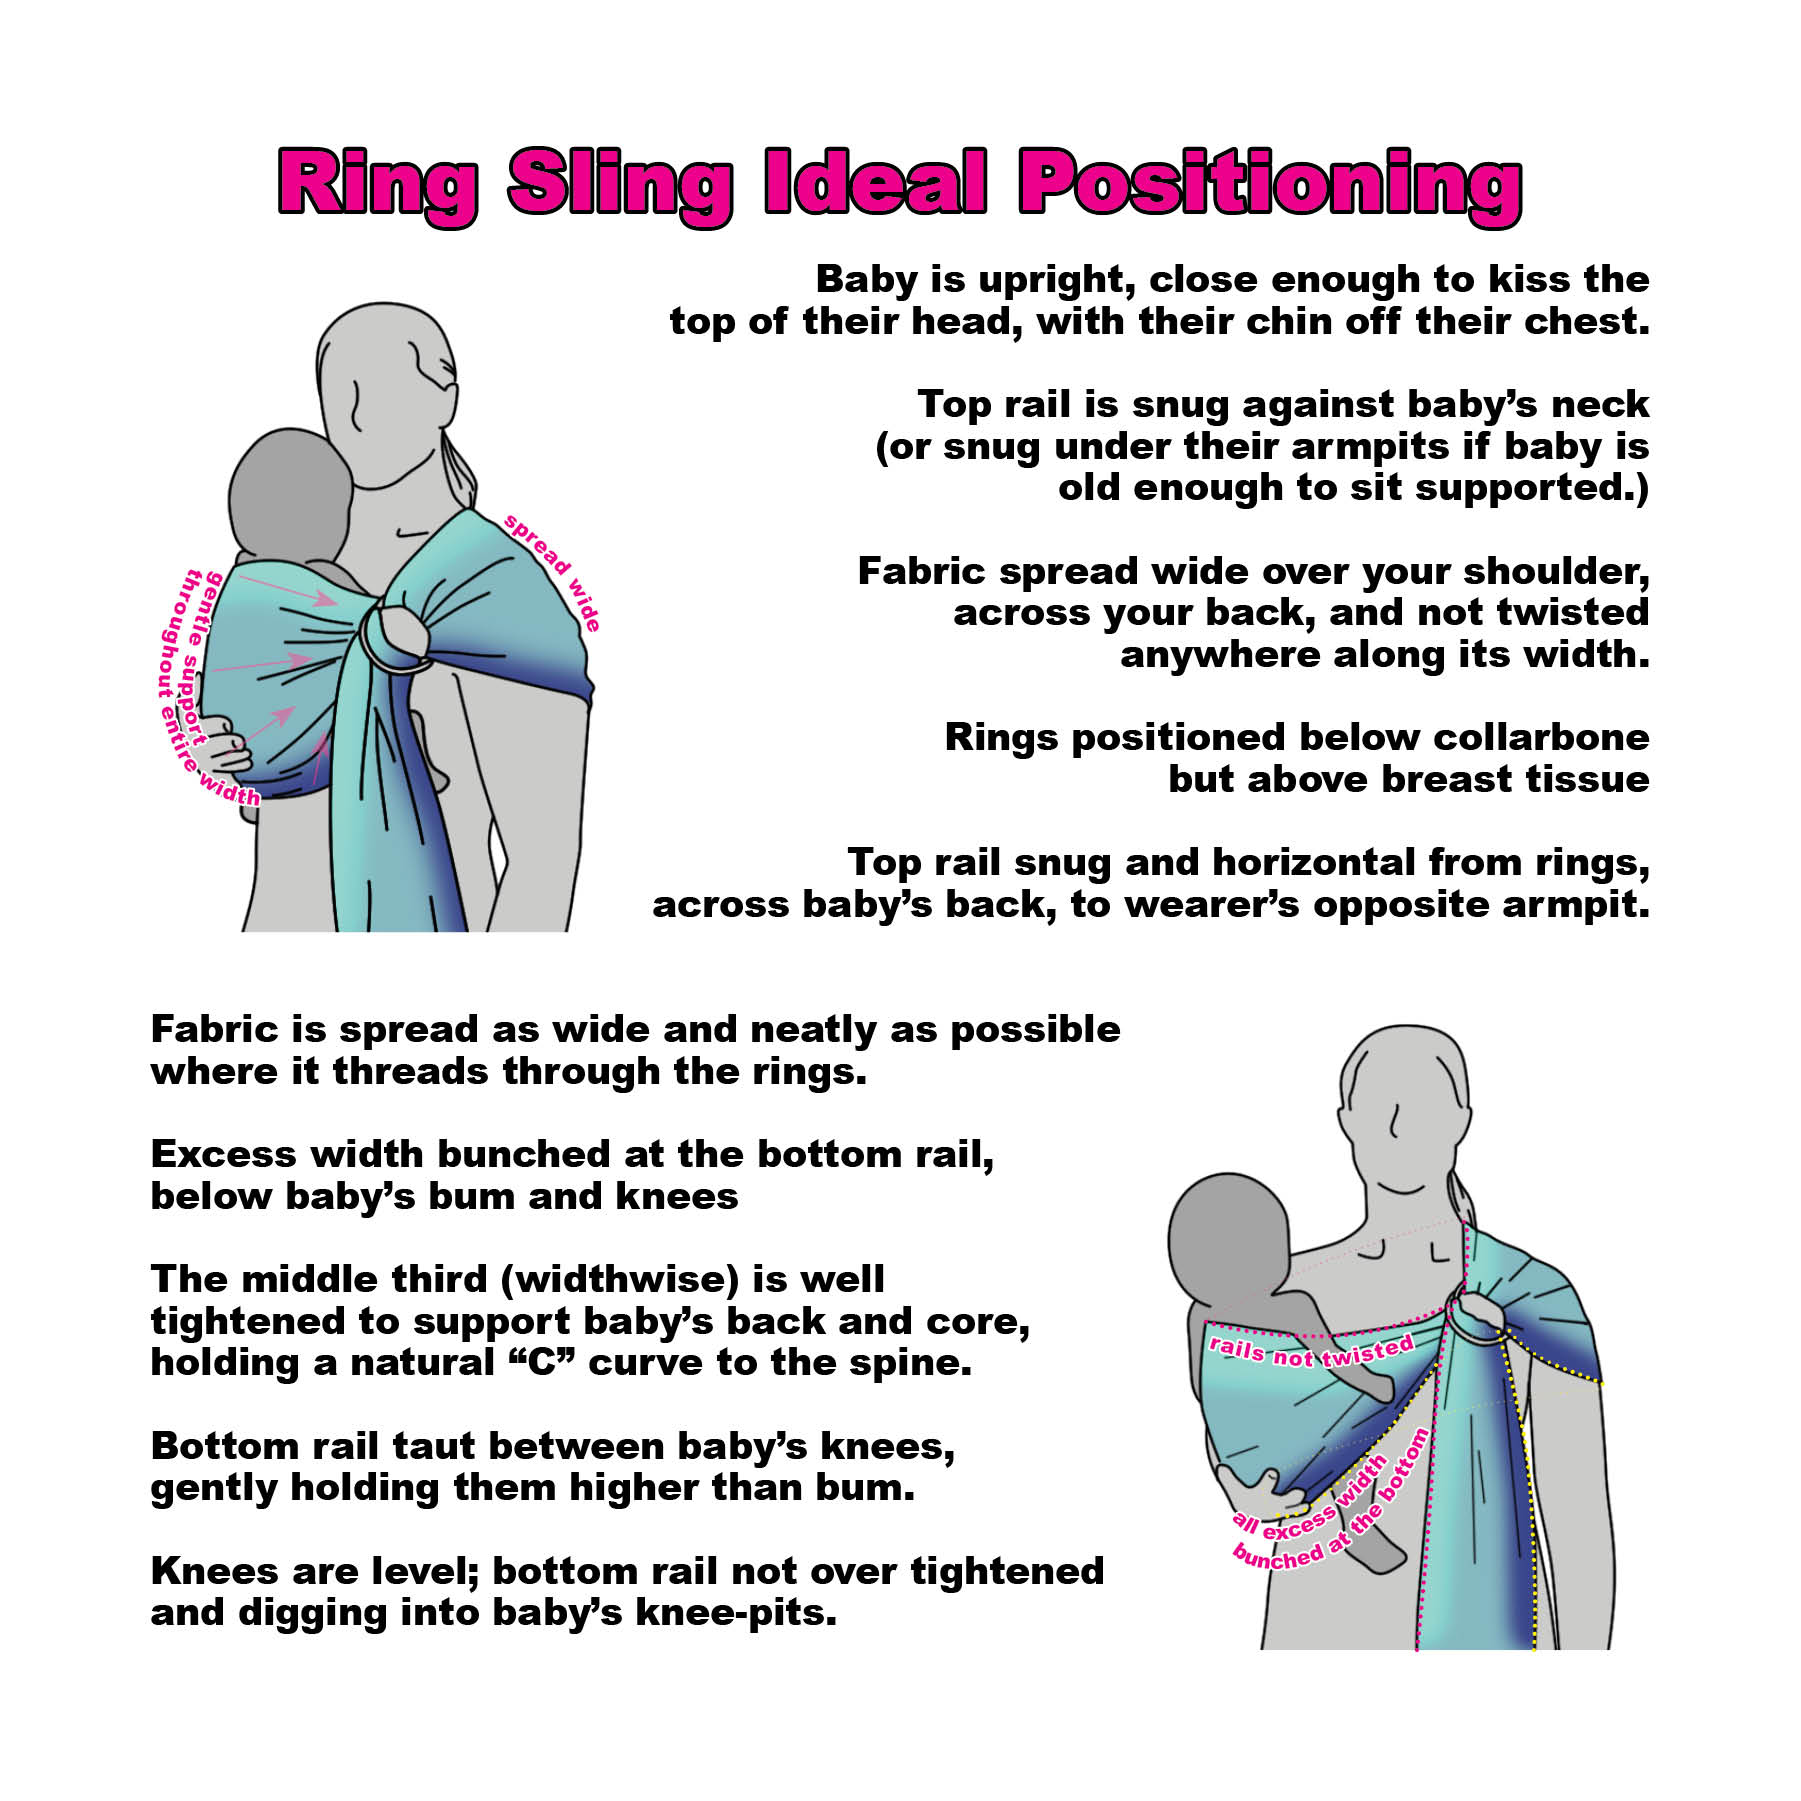 Always follows TICKS rules for safe babywearing, and practice a few times with a doll or weighted purse before trying with a child. Clicking here will start a playlist of my favorite ring sling videos.
Current Babywearing International safety recommendations include wearing babies upright tummy to tummy (not in a cradle carry position) to help ensure a clear airway, and legs outside of the the sling in an M position from birth to make sure baby's weight is on their bum instead of their feet. Be sure to review the TICKS rules for safe babywearing before starting!
Print this card out and fold like an invitation for your own reference, or if you are giving a sling as a gift: HowToUseYourRingSlingCard.pdf
My favorite ring sling videos:
- "How to Thread a Ring Sling" by WrappingRachel
- "(basics) Newborn ringsling 'classic'" by WrapYouInLove
- "How to use a Ring Sling with a Newborn" by WrappingRachel
- "Babywearing (basics) : Ringsling (classic)" by WrapYouInLove (Same technique as above but with an older child)
- "How to do a hip carry in a ring sling with an older baby" by WrappingRachel
- "Ring Sling Troubleshooting: Getting a Great Seat" by WrappingRachel
- "Ring Sling Troubleshooting: Keeping the rings at corsage level" by WrappingRachel
- Ring Sling Front Carry by Nosi me s ljubavlju (Good for those who are hearing impaired or non-English-speaking)
Topic revision: r21 - 2017-07-04 - AlyssaLeonard
Ideas, requests, problems regarding TWiki? Send feedback


