| | | |
Nyia Tutorial
What is a Nyia?
Pronounced "nee-AH" Also referred to as: Hmong baby carrier, narrow-blanket podaegi ( outdated term, listed only for clarification)
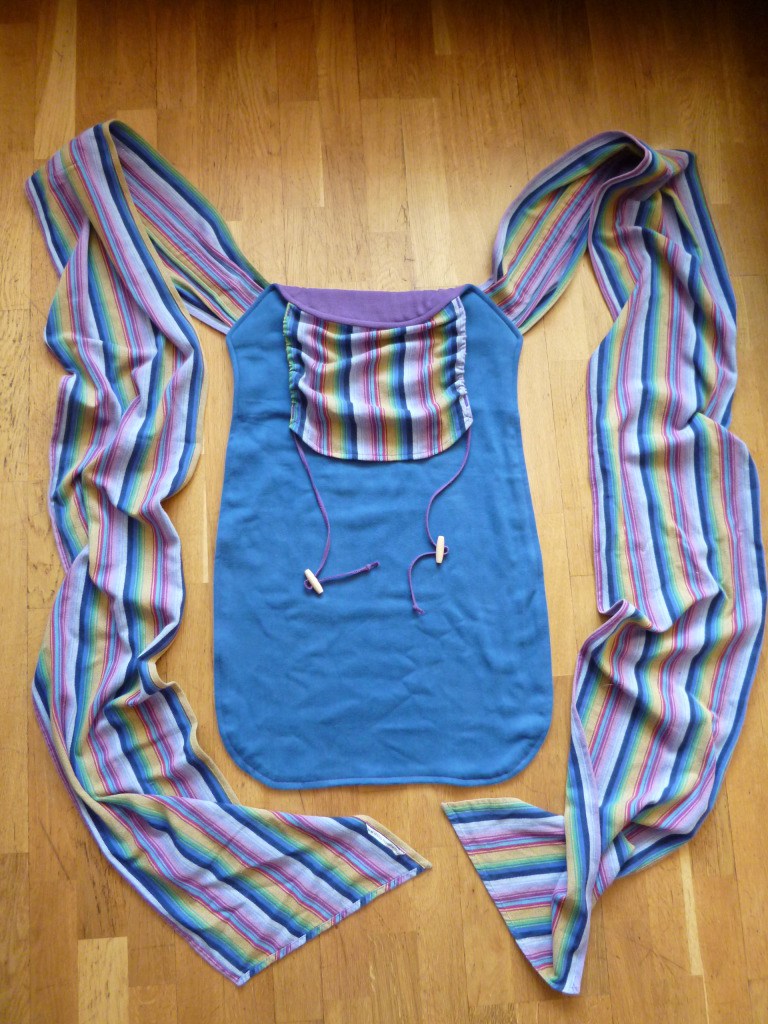
A narrow and long rectangular "blanket" is attached to a long, continous strap coming out horizontally from the top corners of the "blanket." Some have two angled straps coming out of the top corners more like a meh dai, instead.
 |
|
Modern Nyia with angled straps
Image sourced from southlondonslings.co.uk |
Description
A narrow and long rectangular "blanket" is attached to a long, continous strap coming out horizontally from the top corners of the "blanket." Some have two angled straps coming out of the top corners more like a meh dai, instead.
Good For
- Front Carries: Good for all ages
- Hip Carries: Good for babies with strong trunk control.
- Back Carries: All ages (for experienced wearers only)
- Forward Facing: Not designed for forward facing.
Advantages
Simple, traditional construction. Less "material" to deal with than a meh dai or a woven wrap. Breathable in warm weather. Size is nearly universal for all wearers and wearees.Disadvantages
Less common carrier makes documentation on usage harder to find. Safety standards have not been created for nyia, so no commercial nyia exist that pass current carrier safety testing.Variations
- Straight straps: Top straps are horizontal, parallel with the top of the carrier, and sometimes one continuous strap going through the top of the blanket.
- Angled straps: Top straps are two independent straps anchored at an angle to the blanket more like the construction of a modern meh dai.
Sizing
One size fits most. Total combined strap length should be somewhere between the wearer's "base size" wrap (the length needed in a wrap to do front wrap cross carry) and a base-2, so plus size wearers may occasionally need slightly longer straps. Unstructured "blanket" fits newborn-toddler.How to Use
Tutorial
Basic Steps
- Choosing strap fabric
- Choosing blanket fabric
- Bonus: Cutting layouts
- The Strap
- The Blanket
- Assembly
- Learn to use it
- More tutorials
Choosing Strap Fabric
Summary: Cut one strip of bottomweight fabric approximately 15" wide and 180" long, or two strips 15" wide and 90" long.
The strap of your nyia is the primary weight-bearing portion of the carrier. You want a strong, sturdy, wrap-worthy fabric. You can read more about your choices on the page about fabric selection but great options for this project would be patterned duck cloth, a printed or jacquard tablecloth, or bottomweight linen.
While a nyia appears to have two separate straps, the one we are making in this tutorial is constructed with one long, continuous strap running through the top of the blanket. The desired length of this strap should be equivalent to somewhere between a base-2 or base size wrap. Aiming for your base size is a good goal for length. For most average sized women, their base size is a size 6 wrap - <a href="http://wiki.babywearingdiy.com/do/edit/Main/LengthsWidths?topicparent=Main.PodaegiCarrier;nowysiwyg=0" rel="nofollow" title="181` long, or 4.7 meters (this topic does not yet exist; you can create it)">181" long, or 4.7 meters</a>. That's a lot of fabric, so one completely feasible option is to use two shorter pieces and seam them together in the middle. (More on this later, but always be sure to use a reinforced seam like a flat felled seam or french seam.) In this case, you would simply need enough fabric to get two 90" or so straps.
For width, while you can make them as wide or narrow as you like, a good happy medium is around 12"-15".
Choosing Blanket Fabric
Summary: cut a blanket for a nyia approximately 20" wide and 36" long from a woven fabric. For a podaegi, cut a blanket approximately 60" wide and 36" long.
The easiest option for fabric is to simply use the same fabric as you are using for your straps, but a unique aspect of a podaegi with a traditional, continuous strap like this is that the blanket is not weight bearing. What does that mean? It means that you don't have to worry about "bottom weight" fabrics. Quilter's cotton, a soft throw blanket, fleece, mesh, all are options. I briefly considered making a wide-blanket podaegi (where the blanket would wrap around us both) with some thick, padded and quilted fabric in the utility section just for winter use! I would still not recommend anything with stretch (knits, crocheted blankets, etc) simply because while the blanket does not provide any weight-bearing safety support, it does offer some bum support to take the weight off baby's knees and back. A stretchy fabric would not do this, so the only thing supporting baby would be the strap.
As far as the size goes, 30" is a pretty good length that will work for most babies. Nyia blanket panels are very flexible and can be used newborn-toddler. You'll want to add another 6" or so to this height for the amount that will be folded over the top, so you want a total blanket size starting out of 36" high.
As far as width goes, a Hmong Nyia is between 15" and 25" wide (again, flexible.)
A podaegi is similar but with a much wider blanket and is typically tied as a torso carry (although there are other ways to tie it) where the blanket wraps all the way around both baby and the wearer. This can be good for cooler climates or a more traditional looks. It can also be particularly pretty with things like patterned silk, so the wrap around looks very dress-like. The length would be the same as above, but the width would be approximately 60" wide.
Bonus: Cutting Layouts
Trying to figure out how much fabric you need? Hopefully these cutting layouts will help: nyia_cuttinglayouts.pdfThe Strap
Summary: If you started with 2 shorter strap pieces, seam them together with a french or flat felled seam. Hem around all 4 edges. Pleat the center portion of the strap that wil be inside the blanket, and add padding if desired.
Strap: Step 1 - Seaming
If you are starting with one long, continuous piece for your strap, skip to step 2. Otherwise, continue reading.
To join your two strap pieces into one long length, you'll want to use a reinforced seam such as a flat felled seam or a french seam. Jan from Sleeping Baby Productions has an excellent video here on Youtube for these, but I'll show you a visual here as well. For a flat felled seam especially, you'll want to start with the cut edges as straight as possible. The best way to do this with a woven fabric is to remove a weft thread and then cut along the line it left.
Typically when using a flat felled seam, you would start with the right sides together, but it doesn't much matter in this case since the seam will be encased inside the blanket.
Start with the edges you are going to join together parallel, but offset from each other by about 1/4". Stitch a straight line of stitches approximately 1/2" from the top fabric's edge (3/4" from the bottom layer's edge). Fold the overhang from the bottom layer over the end of the top layer and iron it down flat. Then spread the wrap out flat and fold the flap over the opposite way so the raw, folded over edge is hidden. Iron that down flat. Then run another straight line of stitches right along the fold to stitch the "flap" down.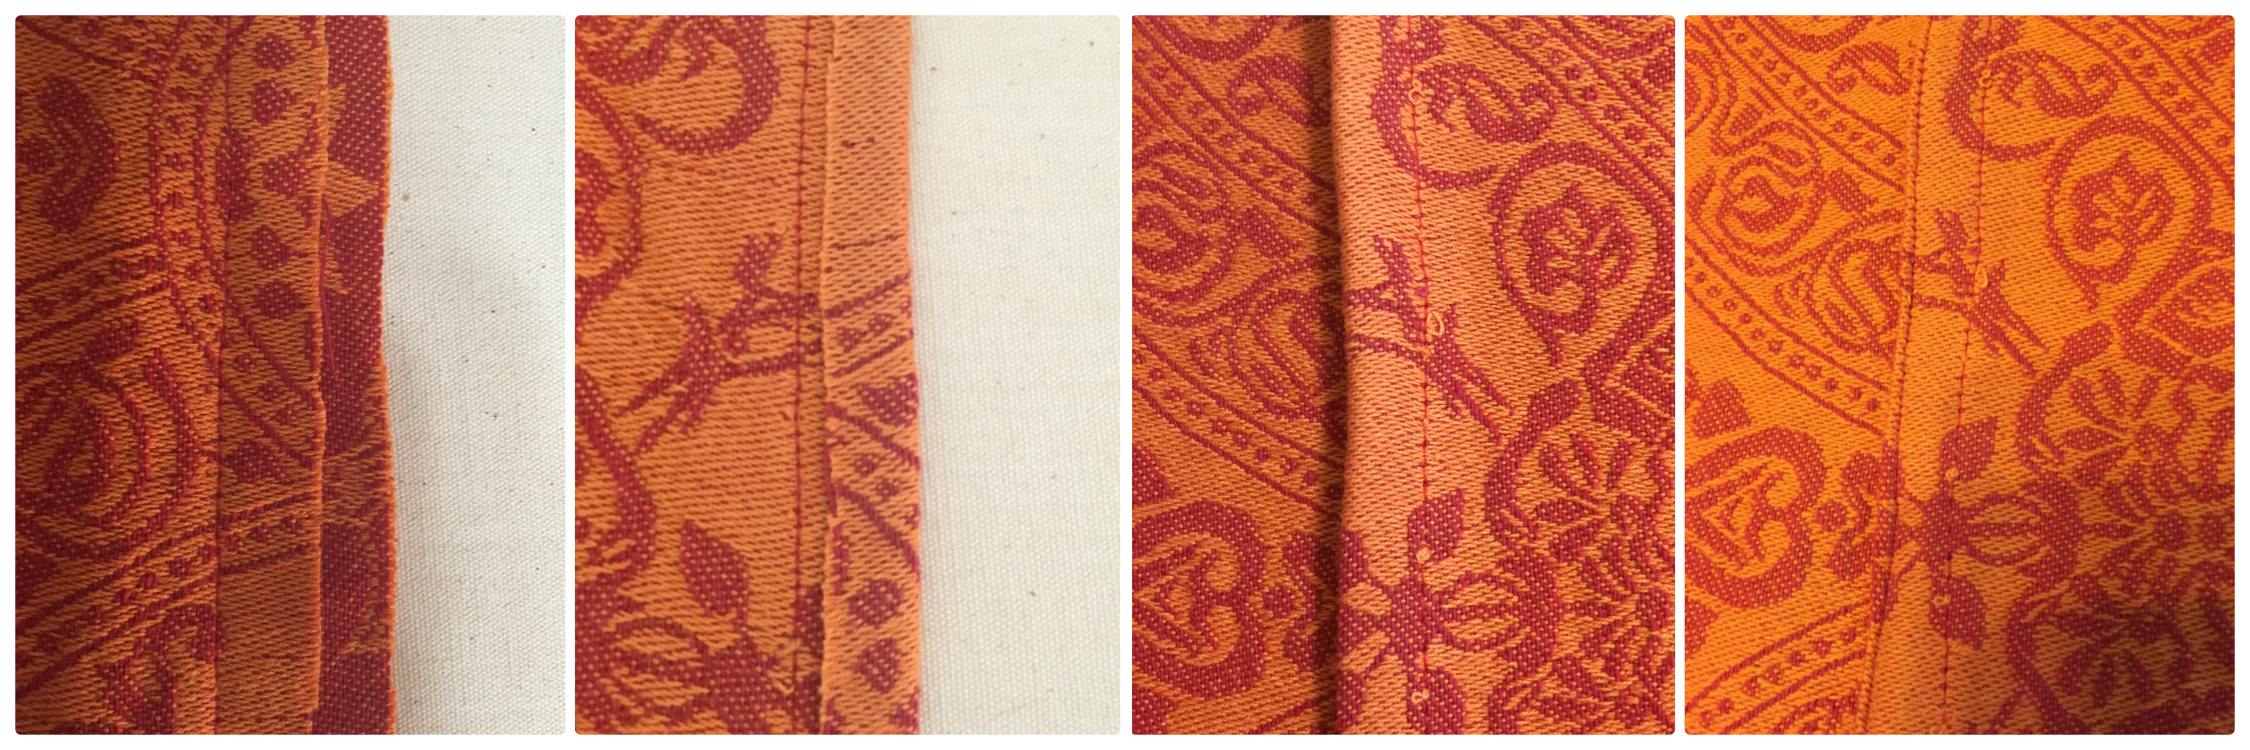 Strap: Step 2 - Hemming
Once you have on long, continuous length of fabric, you simply need to hem all four edges. You can be thorough by folding each edge over about 1/4", iron, and then fold that over another 1/2", iron, and then pin before sewing the fold down with a straight stitch. However, if you are comfortable with your sewing machine, you can just fold it by hand as you go. You could also use a hemming foot if you have one and are familiar with it.
The short edges at the end of the strap can be hemmed normally, tapered and hemmed, serged, or even fringed, all based on personal taste. If you fringe the ends, either tie the fringe into a series of knots or run a line of stitching along the fabric above the fringe to keep any more of the fabric from unraveling.
Strap: Step 3 - Pleating
Time to pleat your strap! You'll want to pleat whatever will be inside the blanket. Since my blanket is about 20" wide, I pleated about 22" of my strap right in the center, which meant marking my strap at the center with chalk or a fabric pencil and then 11" from the center on either side. Then measure along the width of your strap and mark the center in this direction. Mark each half in thirds. Repeat this along the midline, and then again along your lines 11" from the center on either side. My strap was just over 12" wide, so my marks were all about 2" apart.
Then, to pleat, I brought the top-most mark and folded it down to meet the center mark, then ironed it down. I then brought the bottom-most mark up to the center and ironed that in place. I repeated with the marks 11" to each side, so that the entire 22" was pleated.
 Strap: Step 4 - Padding
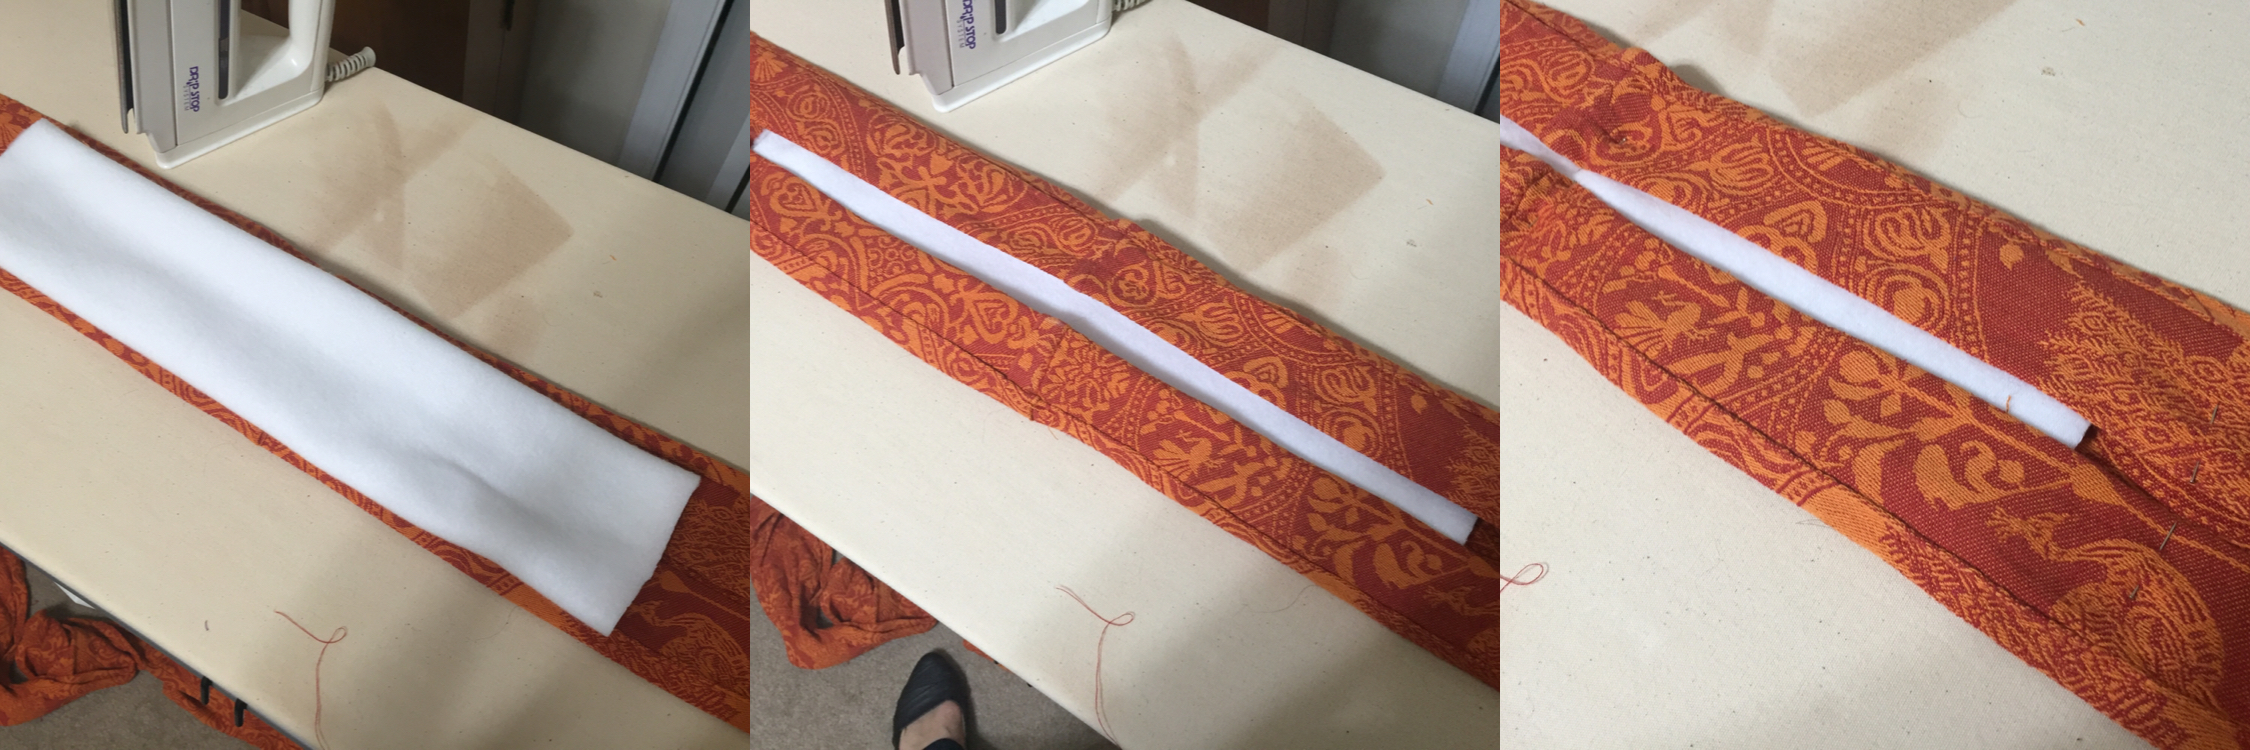
Padding your strap is completely optional. I decided to add 3 layers of fleece I had leftover from another project. I folded a single layer over 3 times to equal the width of my pleated strap (so about 12" of fleece folded in thirds to be 4" high) and then cut the length to just a bit narrower than my blanket (19".) If I were making a traditional podaegi with a wide blanket, I would probably only pad the 15"-20" right in the center, personally. The padding is for baby's benefit; I personally thing that padding along the straps over your shoulders would simply keep the straps from spreading well and be cumbersome.
I then simply put it inside the pleats, and then pinned it into place. At this point, I took it to the sewing machine and ran a few vertical lines of stay stitching in the center and along each edge just to keep my pleats and padding in place.
Start with the edges you are going to join together parallel, but offset from each other by about 1/4". Stitch a straight line of stitches approximately 1/2" from the top fabric's edge (3/4" from the bottom layer's edge). Fold the overhang from the bottom layer over the end of the top layer and iron it down flat. Then spread the wrap out flat and fold the flap over the opposite way so the raw, folded over edge is hidden. Iron that down flat. Then run another straight line of stitches right along the fold to stitch the "flap" down.
 Strap: Step 2 - Hemming
Once you have on long, continuous length of fabric, you simply need to hem all four edges. You can be thorough by folding each edge over about 1/4", iron, and then fold that over another 1/2", iron, and then pin before sewing the fold down with a straight stitch. However, if you are comfortable with your sewing machine, you can just fold it by hand as you go. You could also use a hemming foot if you have one and are familiar with it.
The short edges at the end of the strap can be hemmed normally, tapered and hemmed, serged, or even fringed, all based on personal taste. If you fringe the ends, either tie the fringe into a series of knots or run a line of stitching along the fabric above the fringe to keep any more of the fabric from unraveling.
Strap: Step 3 - Pleating
Time to pleat your strap! You'll want to pleat whatever will be inside the blanket. Since my blanket is about 20" wide, I pleated about 22" of my strap right in the center, which meant marking my strap at the center with chalk or a fabric pencil and then 11" from the center on either side. Then measure along the width of your strap and mark the center in this direction. Mark each half in thirds. Repeat this along the midline, and then again along your lines 11" from the center on either side. My strap was just over 12" wide, so my marks were all about 2" apart.
Then, to pleat, I brought the top-most mark and folded it down to meet the center mark, then ironed it down. I then brought the bottom-most mark up to the center and ironed that in place. I repeated with the marks 11" to each side, so that the entire 22" was pleated.
 Strap: Step 4 - Padding
Padding your strap is completely optional. I decided to add 3 layers of fleece I had leftover from another project. I folded a single layer over 3 times to equal the width of my pleated strap (so about 12" of fleece folded in thirds to be 4" high) and then cut the length to just a bit narrower than my blanket (19".) If I were making a traditional podaegi with a wide blanket, I would probably only pad the 15"-20" right in the center, personally. The padding is for baby's benefit; I personally thing that padding along the straps over your shoulders would simply keep the straps from spreading well and be cumbersome.
I then simply put it inside the pleats, and then pinned it into place. At this point, I took it to the sewing machine and ran a few vertical lines of stay stitching in the center and along each edge just to keep my pleats and padding in place.

The Blanket
Summary: Hem the two long sides of your nyia blanket (or the two short sides of your podaegi blanket.) Either hem or fringe the bottom of your blanket.
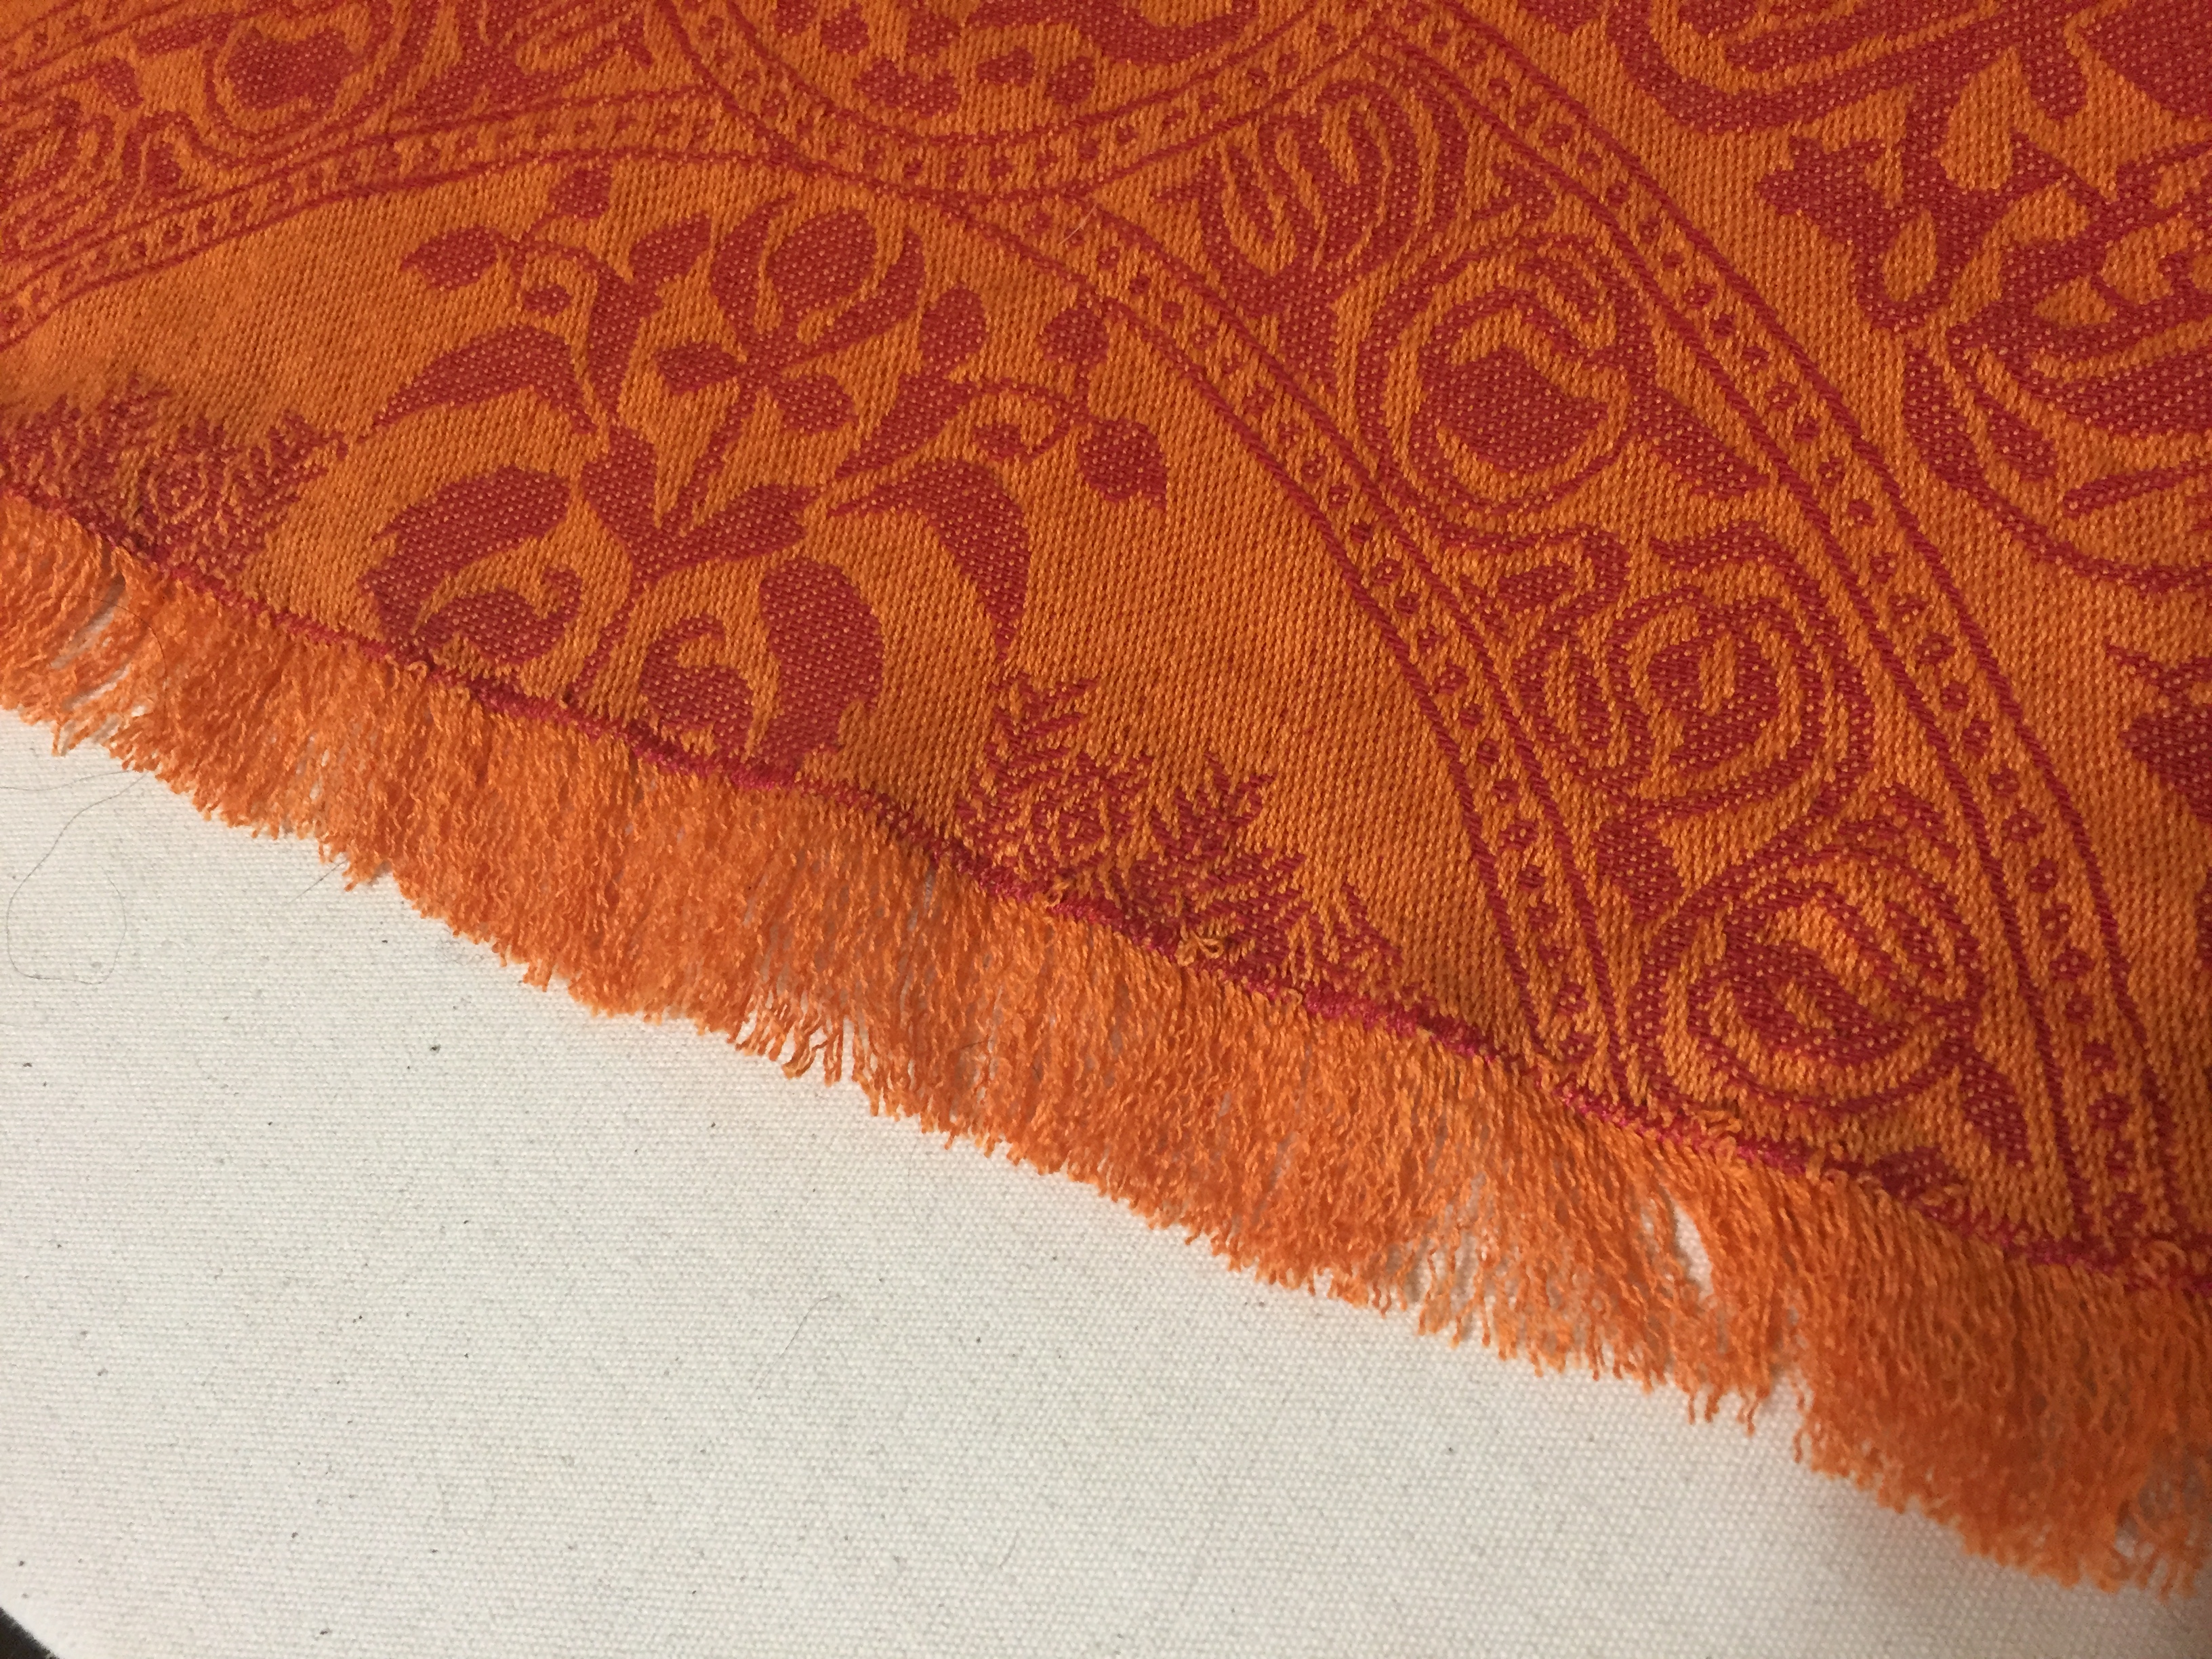
Once you cut your blanket to size, hem the two sides as described above. The top can be left unhemmed. The bottom edge, like the ends of your straps, can be hemmed normally, serged, or fringed. I chose to fringe mine a little bit and then ran a tight line of zigzag stitching right at the edge just to keep it from fringing any further up. With longer fringe, you can finish it instead by tying small sections of fringe together in knots.

Assembly
Summary: Fold the top of the blanket over the center of the strap and secure with both vertical and horizontal stitches.
Time to put it all together! I will both explain how I did mine, and then I will explain how I should have done it to make my life easier.
What I did:
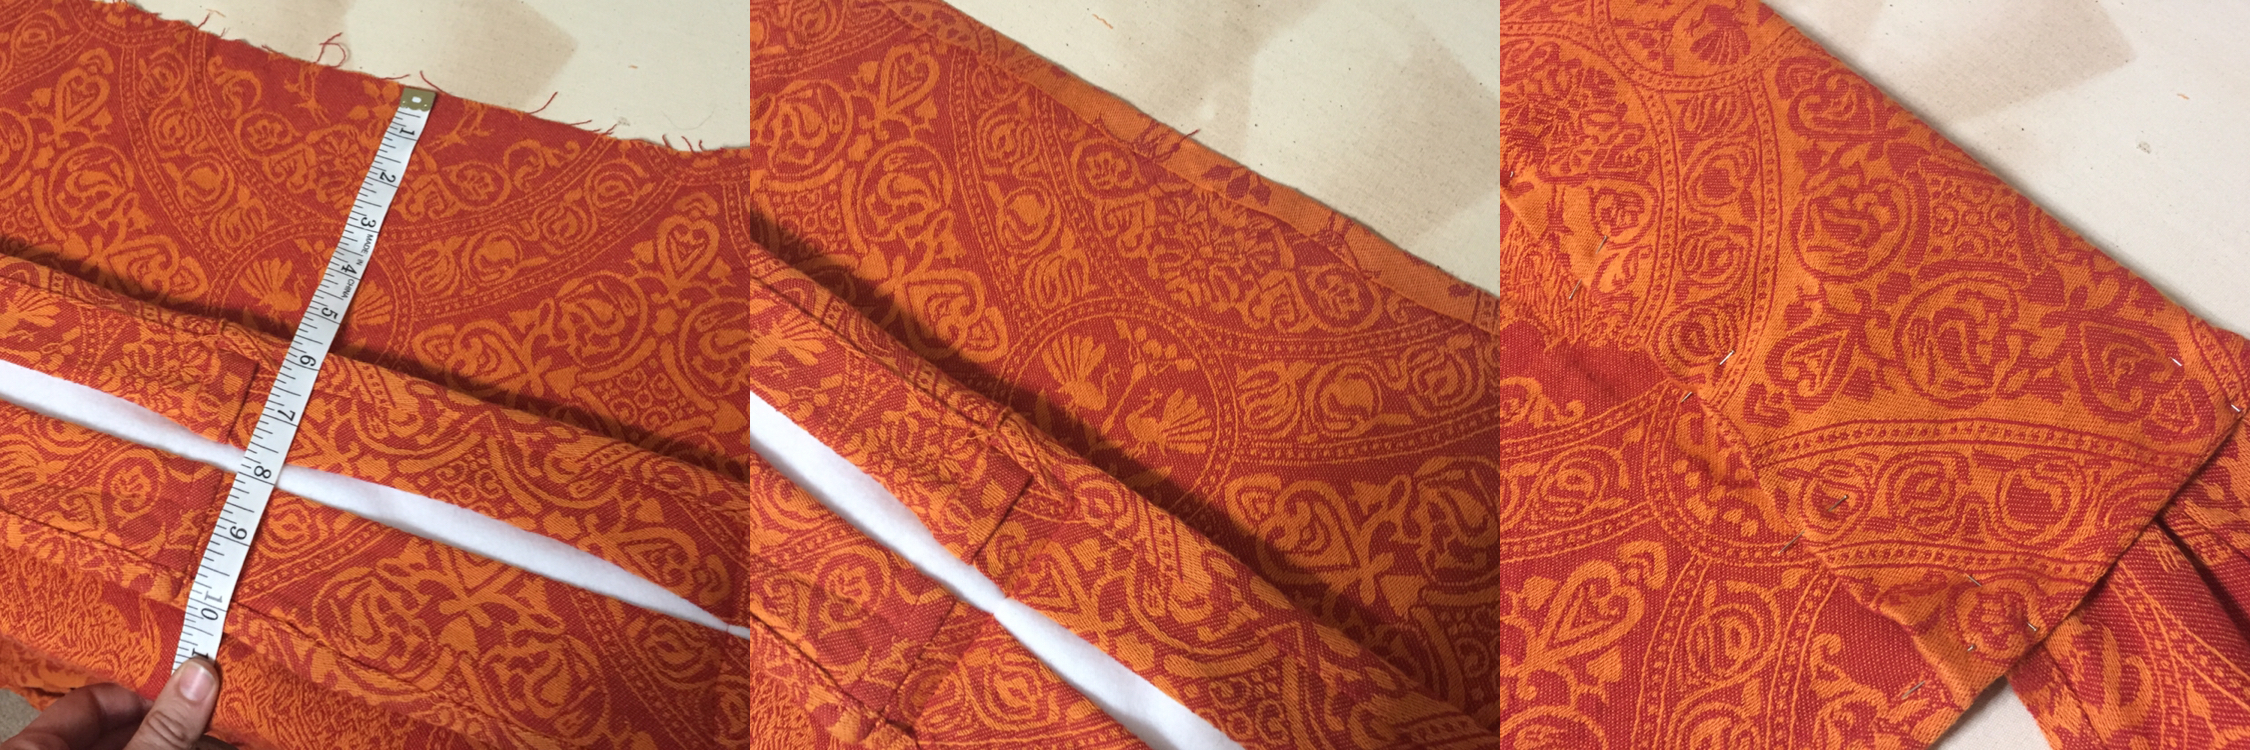
Start by laying the blanket out, right-side-down. Lay the strap, right-side-down, on top of the blanket, perfectly centered. My strap was about 4.5" wide where it was pleated, so I positioned it that distance plus one inch from the top - so 5.5" from the top.
Fold the top 1/2" down and iron.
Then fold the whole top section over the strap. Smooth out and pin in place. The folded over edge should be flat against the blanket below the strap, not on top of the strap. Pin like a fiend, including pinning the open sides to keep the straps in place.
Sew the two open edges closed first to hold the strap in place. Then, sew along the folded edge at the bottom.
 What I should have done
Were I to do it again, I would make my life a little easier by doing this, instead. If this is unclear, check out the " Nyia_Basic.pdf" tutorial, which explains this method with pictures.
Lay the blanket out, right-side-down. Fold over the top 1/2" and iron. Measure the width of your pleated wrap (in my case, 4.5") and fold the top of the blanket down about a 1/2" more than your pleated strap width (so in my case, about 5".) Pin along the folded edge and iron it down. Take to the sewing machine and stitch the edge down, so you have a 4"-5" pocket running along the top of the blanket.
At this point, feed the strap through this pocket, being careful to center it. Then, pin it in place, and run a straight line of stitching along the two open sides of the blanket to hold the strap in place.
Finishing Up
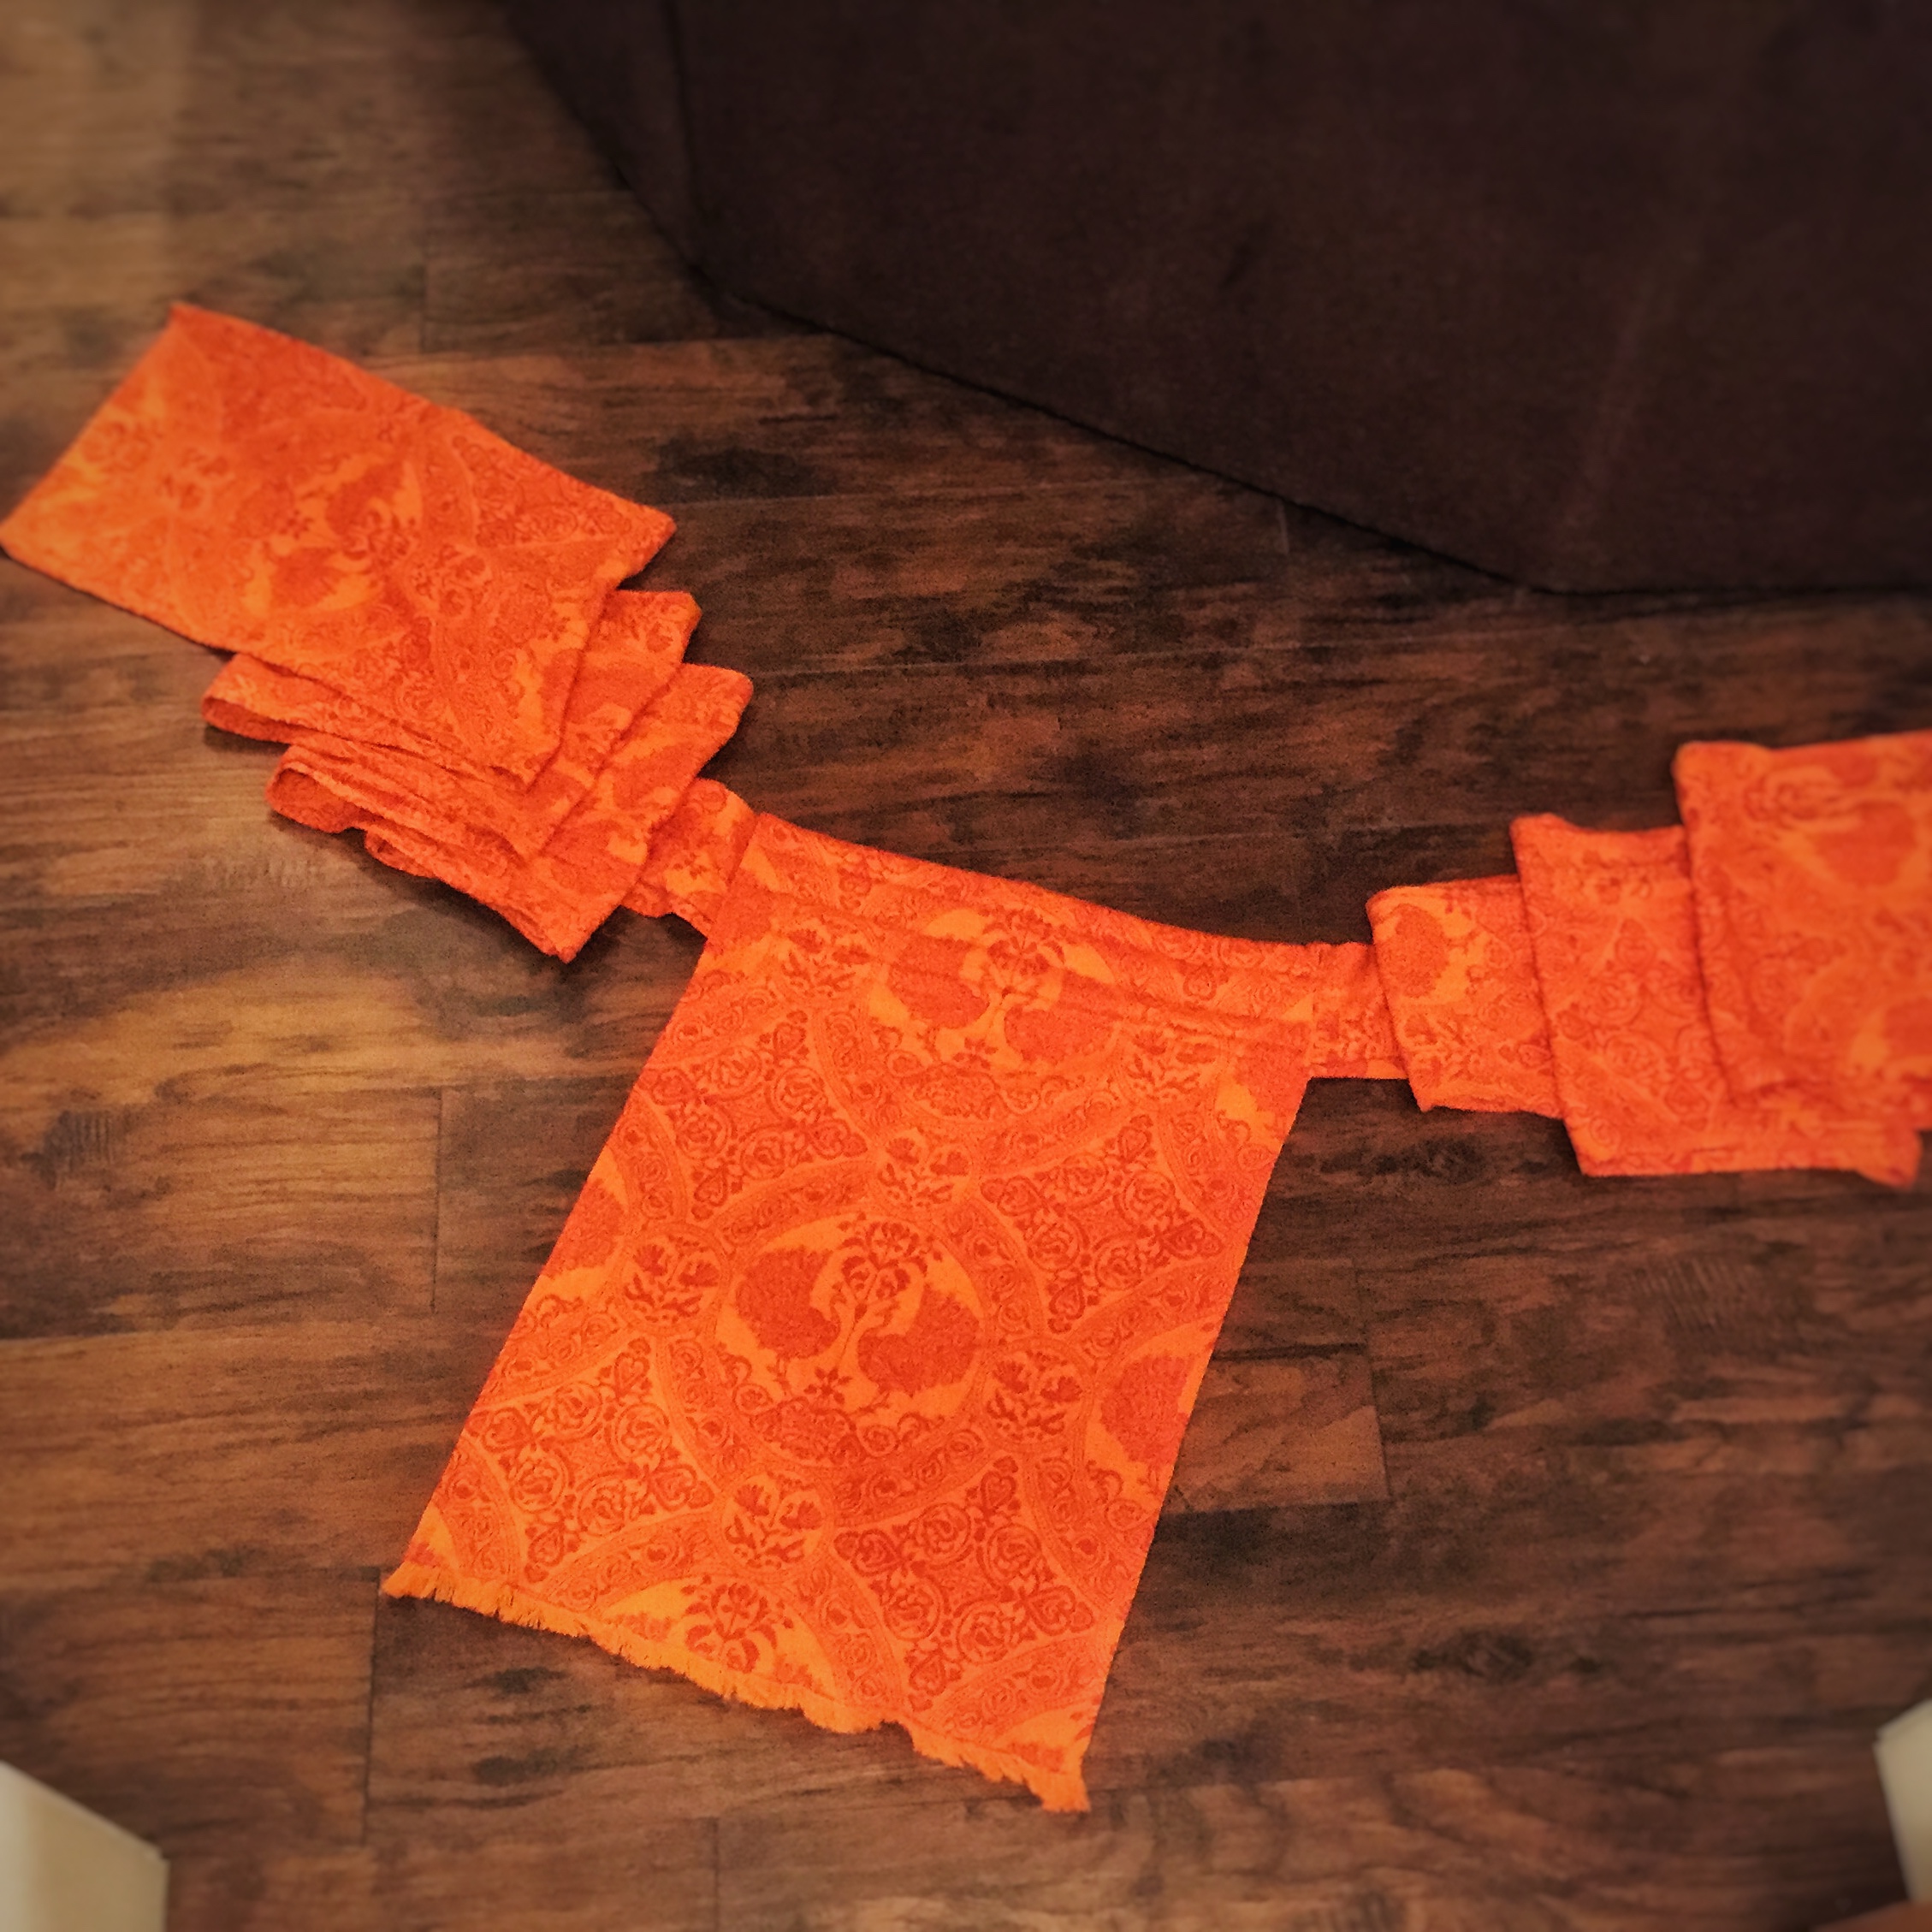
A couple extra lines of stitching along the "headrest" (the portion of the blanket with the strap running through it) will keep the strap from bunching and will add some support. I just ran some simple horizontal lines along mine, but you could also do some quilted designed, decorative stitches, or other shapes.

Learn to use it
Learning to use a nyia or podaegi can be a little trickier, not because they are particularly difficult carriers, but simply because they aren't as common, so documentation is a little more scarce. Here are a few good videos I have found that helped me. Always remember to keep all of the TICKS rules for safe babywearing in mind when carrying your child, and practice over a soft surface with a spotter when first starting out.
External Links to Other Tutorials
The following are more podaegi tutorials. These have some different tips and construction styles. Most of the techniques used in this tutorial were based on the first tutorial, which uses a turkish towel.- (Downloadable PDF) Angelas_Turkish_Towel_Podaegi.pdf (Created by Angela McReynolds)
- (Downloadable PDF) Nyia_Basic.pdf (Same method as above, with less descriptions and more pictures. Printable!)
- (Downloadable PDF) Nyia_Angled_Strap_Basic.pdf Nyia with angled straps like a meh dai
- Pod Tutorial
- Reversible Wrap Pod or Mei Pod
- Good Families Do Blog Podaegi Tutorial
- Sew She Sews Blog Podaegi Tutorial
| I | Attachment | History | Action | Size | Date | Who | Comment |
|---|---|---|---|---|---|---|---|
| |
Nyia_Angled_Strap_Basic.pdf | r1 | manage | 61.0 K | 2017-04-05 - 01:54 | AlyssaLeonard | |
| |
Nyia_Basic.pdf | r1 | manage | 179.7 K | 2017-03-30 - 01:22 | AlyssaLeonard | |
| |
nyia_cuttinglayouts.pdf | r1 | manage | 39.2 K | 2017-03-30 - 01:22 | AlyssaLeonard |
Topic revision: r3 - 2017-04-05 - AlyssaLeonard
Ideas, requests, problems regarding TWiki? Send feedback


